Oct 12, 2026Guides
Windproof Roller Blind Installation: Decisions Before You Drill
Plan a windproof roller blind installation with two illustrated guides: recess versus face fixing, rail alignment, and when to call a professional fitter.
Installing a windproof roller blind comes down to site decisions taken before the first hole: choosing between inside recess mounting and outside face fixing, and confirming a flat, solid surface for the side rails. This article answers the fitting questions that come up most often, from surface checks to knowing when the job needs a professional installer.
Recess or Face Fixing: Choosing the Position
Deciding where the blind sits decides how it integrates with the structure. It depends on the opening and the model. Inside mounting suits recessed openings, where the blind fits directly inside the window recess or is fixed against the wall. Outside mounting gives more coverage: the blind is fitted outside the window frame, over the opening, and mounted to the wall above the window or to the ceiling.
The two positions ask different things of the site, because each works to a different reference surface. On a patio, a pergola or a balcony, that difference often settles the choice before hardware is set out. The position is confirmed together with the model, because the mounting method is read against the opening as well as the unit. Both positions are set out in the measuring method guide, which is the reference to read before any hole position is marked.
Preparation Before the First Hole
A few minutes of preparation avoids most fitting problems. A zip-track roller blind is installed by fixing the brackets or frame first, mounting the cassette, and then feeding the fabric zipper edges into the aluminium side tracks. Both side tracks have to be aligned plumb so the tensioned fabric travels without binding.
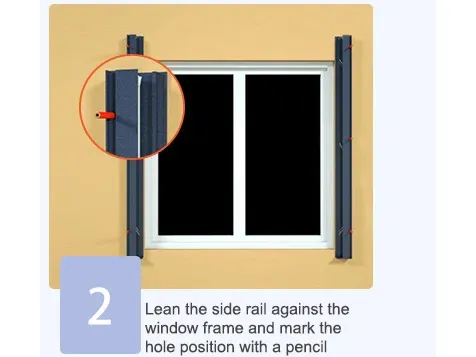
Read the guide that matches the site before unpacking components. eziptrack publishes two illustrated step-by-step guides: one for rails-first mounting inside the frame, and one for fixing outside the window frame, each running to ten steps. The two methods start from different references. Inside the reveal, the sequence works around the frame that is already there. Outside the window frame, the brackets and cassette are set out on the wall above the opening or on the ceiling above. Reading the right guide first is the cheapest way to keep the fitting organised, and reviewing the installation page shows both sequences before drilling begins. The page also carries a video of the complete process, from mounting the side rails to fitting the fabric and testing operation, which is worth watching before the fitting date is set.
The Surface the Rails Fix To
Requirements differ by model and mounting method. The side rails need a flat, solid surface matching the bracket spacing. The mounting surface is the reference the rails are set true against, so a stepped post or a wall that falls out of plane is the first thing to check before fixings go in. A wall, post or column that presents a flat face through the full drop gives the rails a consistent plane to sit on.
Read the profile drawings for the model in question: each model page carries its own set, reached from the products overview. Every project has its own surface, so the fixing face is read on site against that model's requirements. Where the wall, post or column leaves any doubt, raise it with us before the drill goes in; it is better settled at planning stage than on the fitting day.
Troubleshooting a Fit That Looks Off
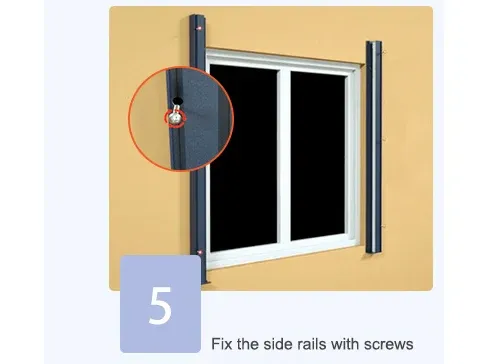
When the fabric runs unevenly after installation, alignment comes first. Check that brackets sit level and the side rails are parallel and vertical. Uneven fabric often points to a twisted rail or a mount off level, so recheck alignment before anything else is changed.
The order of the check matters. Work back through the mounting before adjusting anything else, using the alignment checks in the illustrated guide as the reference; the same check applies whichever method was used to fit the blind. An uneven screen is a mounting question until the mounting has been cleared.
When to Call a Professional Fitter
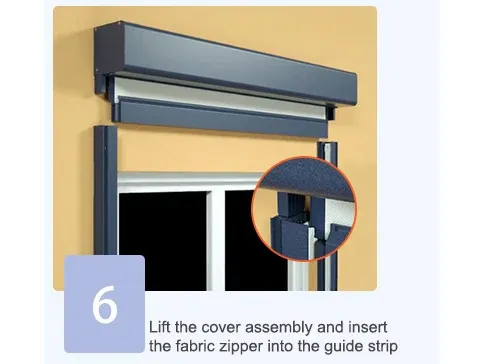
The two illustrated guides describe the work for a standard opening: brackets first, tracks set plumb, then the fabric edges into their channels. Where the site itself raises the difficulty, the fitting changes hands. High elevations, very large blinds and difficult wall substrates are the conditions the guidance names, and a fitting that matches any of them belongs with a professional installer. Settling that question early is part of the specification conversation, and it is worth raising before the fitting date is set. A wide unit, such as the hand-crank manual blind, is the kind of job where that question comes up first.
What Affects the Time on Site
Installation time depends on the opening dimensions, the mounting method, the fixing substrate and how many blinds are being fitted. No single figure applies to every job. Fitting inside the frame with the rails-first sequence involves different alignment steps from fixing outside the window frame, so the method shapes the day on site.
Opening size changes handling as well. A compact balcony blind moves into position quickly; a wide span across a restaurant terrace or an outdoor venue takes more hands and more care. The substrate decides how long the drilling itself takes, and a schedule with several blinds scales with the count. The two illustrated ten-step guides show the sequence for each method, which is where a fitting plan starts; the ordering process can confirm dimensions and configurations before the fitting date is booked in.
Access for Cleaning Depends on the Model
Planning the mounting also means planning for later access. How a unit comes off for cleaning depends on the model, and the correct sequence for any given unit comes from its own documentation rather than from a general rule.
The point at installation stage is to leave the fixings reachable. Where trim, cladding or fascias are planned around the unit, the access question is worth settling while the mounting plan is being made rather than after the finish goes on. The right sequence for the unit in hand is set out where the model's documentation lives, and that is the reference to follow.
Fitter Questions, Answered
Recess or Face: How Do I Decide?
Match the position to the opening rather than to preference: a recessed opening suits an inside fit, and an outside fit gives more coverage around the opening. The measuring method guide sets out the surface each position is measured to, and the product page or a word with us confirms which orientation suits the installation.
What Does a Flat, Solid Surface Mean?
The rails are set true against the surface they fix to, so the fixing face is read before drilling. It has to be a flat, solid surface, and it must match the bracket spacing for the model being fitted. Both points are confirmed per model and mounting method, so check the product page or ask us.
The Screen Hangs Unevenly - What Comes First?
Alignment, before anything else: brackets level and the side rails parallel and vertical. A screen that runs unevenly most often traces back to a rail out of line or a mounting that sits off level, so the mounting is checked before any other part is adjusted.
What Access Does Cleaning Need?
It varies by unit: removal for cleaning depends on the model. Check the product page or the manual for the correct sequence, or ask us. At planning stage, the practical point is simply to keep the fixings reachable.
Who Should Fit the Blind?
A competent fitter can work through it using the two illustrated guides. The job means fixing the mounting brackets, aligning the aluminium side tracks plumb, and setting the fabric zipper edges into the channels. For high elevations, very large blinds or difficult wall substrates, use a professional installer.
What Sets the Time on Site?
Several variables, starting with the size of each opening and the method used to fit it. The substrate the brackets go into matters, and so does how many units are on the schedule. Because inside-frame and outside-frame sequences involve different alignment steps, the two illustrated guides are the reference for scheduling as well as fitting.
Start With the Site, Not the Drill
Start with the site, not the drill. Confirmed opening dimensions and a clear picture of the mounting surface come first: send us the width and height of each opening, the preferred fabric transmittance and frame colour, and our team will confirm the configuration and provide a quotation.
For model recommendations or fitting questions, submit your project details through our contact us page or email raymond@eziptrack.com. The site lists a shipment lead time of 7–15 days, so a confirmed configuration early in the schedule keeps the fitting date realistic.